
I've been playing with a bit of patternmaking lately.
A few Christmases ago I received Patternmaking for Fashion Design, but didn't have a lot of time to play with it. The basic blocks take a bit of calculation. Nothing major, but I'd been biking a bit and losing baby-weight and didn't want to put a lot of time into making my own blocks, just to have them change before I got to sew up some clothes.
Recently, however, I came across an article talking about some new open source pattern-making software. I played with Valentina a bit, but I was really drawn towards the Tau Meta Tau Project. Susan, from TMTP is currently working on Valentina as well, so I expect the whole thing will be quite awesome in a year or two.
I'm not patient, though, and don't mind a bit of hacking, so I've been making TMTP do what I want it to and have had quite a bit of fun with it. All I've done so far is make the basic bodice, skirt, and dress blocks, but in the process, I've done quite a bit of work to get things more streamlined for myself. Also, I had to find a new source for pattern blocks, because, having done all of this work, I wanted to be able to share! So I did some research and came across a wonderful, copyright expired book by Esther Pivnick, that had been scanned by The Perfect Nose.
Anyways, the basic idea is, once you've got the extensions saved, you open Inkscape, load and extension, enter your measurements, and you have a block custom fit to your body. If you don't want to bother with your measurements, it can also load up standard sizes, but then it isn't quite so perfect.
If you want to play with it yourself, click on the "Open Source Patternmaking" link at the top of the page, or go here.
Sunday, February 2, 2014

Saturday, April 2, 2011
Kimono-Style Doll Shrug
 I've been working on this design for a little while. The idea is similar to a sweater that one of Maddy's grandmother's helped me make for her. It is a Kimono Style Shrug that allows for a lot of creativity. It comes together in two pieces each of which can be either knot or crocheted. Since they can also be worked in different colors of yarn, the possibilities are quite numerous.
So, anyway, the pattern is available as a free download on Ravelry. I'll also be selling it in my Etsy store. I may start charging for it on Ravelry in the next month or so, so if you want it, be sure to add it to your Library now and it will stay free for you.
If you aren't a Ravelry member (you should be!) you can still use this direct link (PDF): Kimono-Style Doll Shrug.


Friday, March 25, 2011
A Dress for Maddy


 |
| Don't you just love the linebacker pose? |
The pattern is almost done and I have a great pair of reversible pants waiting to be matched with a new tunic. When I get them done, I'll list them in the shop and let you know!
Sunday, March 13, 2011
Lemmings!

The only problem was that I didn't know how to crochet and the lemmings are a bit fiddly for a first projects.
I picked them up and abandoned them about a year ago, but with my knew interest in crochet they are back again and they are fantastic! Here is the simple walker lemming, but I'm sure others will appear in time.
Sunday, March 6, 2011
Flourless Chocolate Cake
Once upon a time a good friend was placed on a gluten free diet. I wanted to give her a treat when she came over for dinner one night so I made her this flourless chocolate cake from Epicurious. I had reason to resurrect the recipe again recently when another friend was diagnosed with Celiac's Disease. This time I added a simple raspberry coulis to dress it up a bit.

Flourless Chocolate Cake
4 ounces fine-quality bittersweet chocolate (not unsweetened)
1 stick (1/2 cup) unsalted butter
3/4 cup sugar
3 large eggs
1/2 cup unsweetened cocoa powder plus additional for sprinkling
Directions
Preheat oven to 375°F and butter an 8-inch round baking pan. Line bottom with a round of wax paper and butter paper.
Chop chocolate into small pieces. In a double boiler or metal bowl set over a saucepan of barely simmering water melt chocolate with butter, stirring, until smooth. Remove top of double boiler or bowl from heat and whisk sugar into chocolate mixture. Add eggs and whisk well. Sift 1/2 cup cocoa powder over chocolate mixture and whisk until just combined. Pour batter into pan and bake in middle of oven 25 minutes, or until top has formed a thin crust. Cool cake in pan on a rack 5 minutes and invert onto a serving plate.
Dust cake with additional cocoa powder and serve with sorbet if desired. (Cake keeps, after being cooled completely, in an airtight container, 1 week.)
Raspberry Coulis
1 lb frozen raspberries
1/4-1/2 cup sugar (I prefer raw or brown)
Directions
Thaw raspberries and blend with sugar in food processor until even in consistency. Serve over flourless chocolate cake, ice cream, yogurt, or something else.
Flourless Chocolate Cake
4 ounces fine-quality bittersweet chocolate (not unsweetened)
1 stick (1/2 cup) unsalted butter
3/4 cup sugar
3 large eggs
1/2 cup unsweetened cocoa powder plus additional for sprinkling
Directions
Preheat oven to 375°F and butter an 8-inch round baking pan. Line bottom with a round of wax paper and butter paper.
Chop chocolate into small pieces. In a double boiler or metal bowl set over a saucepan of barely simmering water melt chocolate with butter, stirring, until smooth. Remove top of double boiler or bowl from heat and whisk sugar into chocolate mixture. Add eggs and whisk well. Sift 1/2 cup cocoa powder over chocolate mixture and whisk until just combined. Pour batter into pan and bake in middle of oven 25 minutes, or until top has formed a thin crust. Cool cake in pan on a rack 5 minutes and invert onto a serving plate.
Dust cake with additional cocoa powder and serve with sorbet if desired. (Cake keeps, after being cooled completely, in an airtight container, 1 week.)
Raspberry Coulis
1 lb frozen raspberries
1/4-1/2 cup sugar (I prefer raw or brown)
Directions
Thaw raspberries and blend with sugar in food processor until even in consistency. Serve over flourless chocolate cake, ice cream, yogurt, or something else.
Wednesday, February 23, 2011
Chocolate Apricot Sourdough Bread
A friend gave me a sourdough starter recently and I've been trying out all things sourdough. I recently came across this Chocolate Cranberry Sourdough Bread and thought to give it a try. It was ... lacking. For one, you might notice that it has no real source of sugar. Well, cocoa really needs some sweet to give it any flavor. The bread is also completely lacking oil. Finally, well, I admit to not liking cranberries so much. So I tweaked it.
 My version is still pretty sour. I think that is to be expected from sourdough. If you want to cut it a bit I would use sweeter apricots. I might also try some dried cherries in the next round. If you've never worked with sourdough before, I recommend starting with this recipe to get a good understanding of the process.
Chocolate Apricot Sourdough Bread
2 cups dried sour apricots
2 cups orange juice (or water)
1 1/2 cups active sourdough starter
Directions
The night before:
Boil the apricots in the orange juice for around five minutes. Drain the apricots reserving 1 1/2 cup juice. Set aside the apricots until morning. In a non-metallic bowl mix juice, 2 cups flour, and starter. Cover and set someplace warm and moist overnight.
In the morning:
Transfer your sponge into your mixing bowl and add oil, syrup, and cocoa. Mix with your dough hook until consistent. Add flour 1/2 cup at a time until the dough is workable but still quite moist. You don't want to be able to pour your dough, but you don't want it as dry as a traditional yeast bread, either.
Add your apricots and revisit the consistency of your dough. You may find that with the added moisture in the apricots you need to add a bit more flour. Mix with your dough hook for another 5 minutes. Add the chocolate chips and mix until they are evenly distributed.
Divide the dough into two parts and place in bread pans for rising. Once the dough has risen to about double, bake at 425F for 35-50 minutes.
My version is still pretty sour. I think that is to be expected from sourdough. If you want to cut it a bit I would use sweeter apricots. I might also try some dried cherries in the next round. If you've never worked with sourdough before, I recommend starting with this recipe to get a good understanding of the process.Chocolate Apricot Sourdough Bread
2 cups dried sour apricots
2 cups orange juice (or water)
1 1/2 cups active sourdough starter
2 cups bread flour
1/2 cup coconut oil (or butter), melted
3/4 cup maple syrup (or honey, or something else sweet)
3/4 cup Dutch process cocoa powder
1 1/2 - 3 cups bread flour
1/2 bag chocolate chipsDirections
The night before:
Boil the apricots in the orange juice for around five minutes. Drain the apricots reserving 1 1/2 cup juice. Set aside the apricots until morning. In a non-metallic bowl mix juice, 2 cups flour, and starter. Cover and set someplace warm and moist overnight.
In the morning:
Transfer your sponge into your mixing bowl and add oil, syrup, and cocoa. Mix with your dough hook until consistent. Add flour 1/2 cup at a time until the dough is workable but still quite moist. You don't want to be able to pour your dough, but you don't want it as dry as a traditional yeast bread, either.
Add your apricots and revisit the consistency of your dough. You may find that with the added moisture in the apricots you need to add a bit more flour. Mix with your dough hook for another 5 minutes. Add the chocolate chips and mix until they are evenly distributed.
Divide the dough into two parts and place in bread pans for rising. Once the dough has risen to about double, bake at 425F for 35-50 minutes.
Monday, February 21, 2011
A Bit of Crochet


My two recent favorites are a cute little apple by June of Planet June and the Angry Bird Cardinal (pattern link) from Karla of Itsy Bitsy Spider. What do you think?
Friday, February 12, 2010
Banana Bread
We had some mushy bananas sitting around the house, so I decided to put together some last minute banana bread. Not having a recipe for said banana bread, I of course scoured the web and then modified my own.
I substituted the 1 cup of sugar for 1/3 c brown sugar and 1/3 c white sugar and doubled the cinnamon. I think next time I will add as much nutmeg and cut out even more sugar. No point in making something 'healthy' that is loaded up with white sugar.

I substituted the 1 cup of sugar for 1/3 c brown sugar and 1/3 c white sugar and doubled the cinnamon. I think next time I will add as much nutmeg and cut out even more sugar. No point in making something 'healthy' that is loaded up with white sugar.
Thursday, August 6, 2009
Dressed to a T(-shirt)

I love dressing Maddy in long dresses. They are so cute and a lot of fun to make. They'll be a bit easier when she starts walking and they don't bunch up all the time, but I still think they're pretty cute right now anyway. So with all of the t-shirt dresses popping up (Happy Together and luvinthemommyhood), I decided it was time for me to make my own. It's really simple. Only the sides are sewn together, everything else is left raw and the straps are tied at the top. I am pretty fond of the cute little denim birdie though.

Maddy's not so sure about this green stuff she's standing in. It's a bit poky.

Now she's ready to face the world!
Thursday, July 30, 2009
Loading up on Diapers
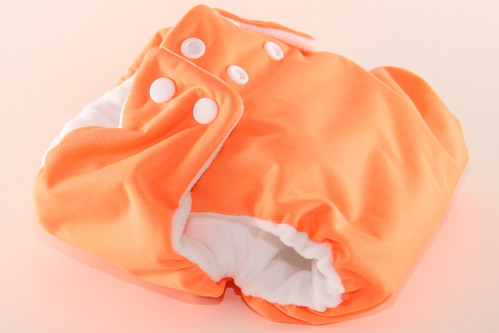 For the past few months I have been diapering Maddy with flats folded with the origami fold and a diaper cover, but I am getting tired of folding them every day. I have been selling contour diapers for awhile and had planned to make a bunch for myself, but I broke down and bought a snap press for my birthday and set about finding the perfect way to make fitteds and AIOs. I don't like having my seams show, so I set about hiding them by adding the fancy feature of a pocket and I don't like having to try to line up fabrics that are shift by nature, so I decided to solve that by trimming everything after the fact. Below is what I have discovered.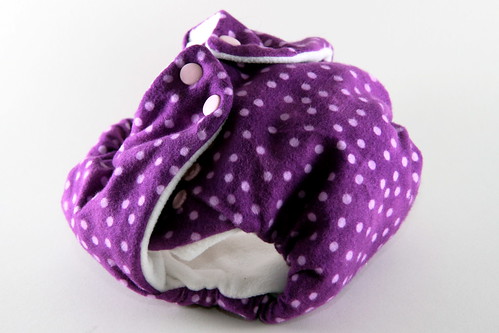
Don't forget, if you don't have the time or inclination to make them yourself you can by them at http://www.lazydayartifacts.com/
Materials:
These pictures are for a diaper I was selling, so they use new fabrics, but when I am making diapers for my own baby, usually I forage all but the PUL from the thrift store. For high quality diaper fabrics, I highly recommend Kids in the Garden. They sell single cuts of PUL for diapers and most of their fabric is available by the inch.
* 20" x 15" piece of microfleece or any other soft lining fabric. I like microfleece because it keeps the moisture away from the baby's bum.
* One flat fold diaper or other absorbent fabric. You'll want something that keeps it's shape, as this is what you'll draw your pattern onto.
* 20" x 20" piece of flannel or PUL depending on whether you are making a fitted or AIO
* Some cardboard from a shipping or cereal box for tracing your pattern.
* Scissors, thread, etc.
First, you need a pattern. Fern and Faerie 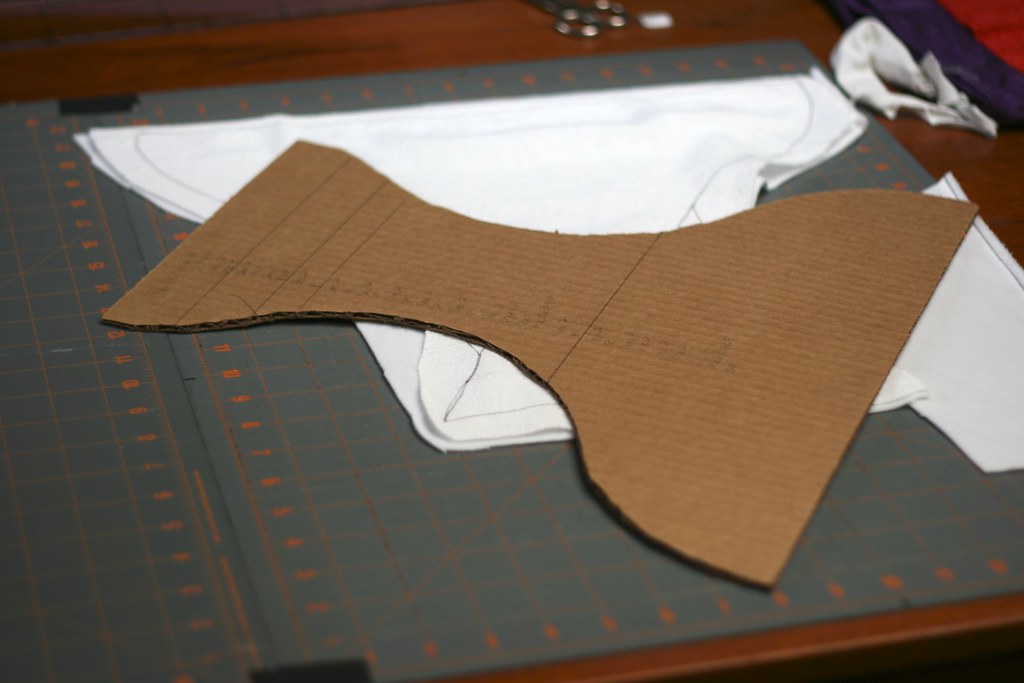 provides a nice pattern to start. The cardboard cutout I have is for contour diapers. I find that when you add the elastic for fitteds, you want some more room through the legs, otherwise the elastic can't handle the lining. So, I lose the hourglass shape through the legs and replace it with a straight line. provides a nice pattern to start. The cardboard cutout I have is for contour diapers. I find that when you add the elastic for fitteds, you want some more room through the legs, otherwise the elastic can't handle the lining. So, I lose the hourglass shape through the legs and replace it with a straight line. |
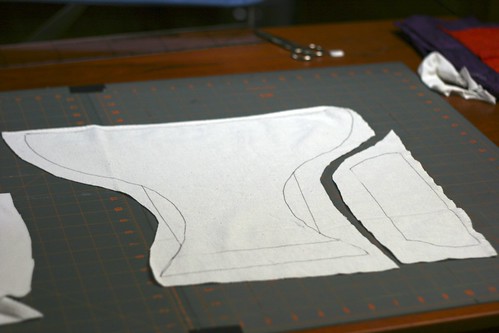 Make two lines at the top of your pattern. One should be about an inch and a half down and the other about two and a half inches. This will be where your stuffing pocket goes. Trace this pattern onto your absorbent layer, stopping at the top line you drew. Then trace the top portion (between the top and the second line). This bit should fit between the leg opening and the side of your material as you can see to the right. Cut these out roughly, making sure to leave a minimum half-inch seam allowance. Make two lines at the top of your pattern. One should be about an inch and a half down and the other about two and a half inches. This will be where your stuffing pocket goes. Trace this pattern onto your absorbent layer, stopping at the top line you drew. Then trace the top portion (between the top and the second line). This bit should fit between the leg opening and the side of your material as you can see to the right. Cut these out roughly, making sure to leave a minimum half-inch seam allowance. |
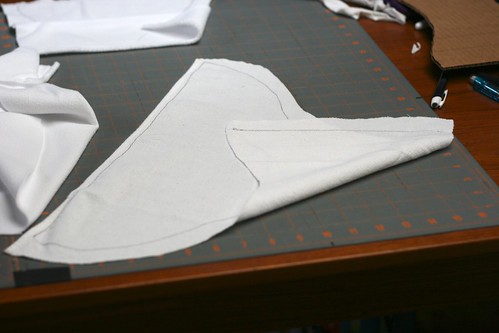 For both pieces, you will want to trace the pocket opening onto the back of the material. This will provide your guide when you attach the absorbent material and the liner. For both pieces, you will want to trace the pocket opening onto the back of the material. This will provide your guide when you attach the absorbent material and the liner. |
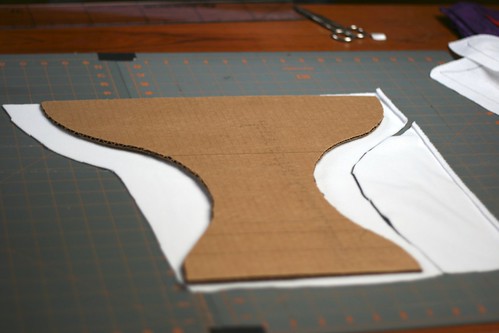 Roughly cut out your microfleece the same way you cut your absorbent layer. Cut the flannel or PUL to the size of the whole diaper. Don't worry about precision, as long as you leave enough room. It is much easier and neater to do all of the trimming after everything is sewn together. Roughly cut out your microfleece the same way you cut your absorbent layer. Cut the flannel or PUL to the size of the whole diaper. Don't worry about precision, as long as you leave enough room. It is much easier and neater to do all of the trimming after everything is sewn together. |
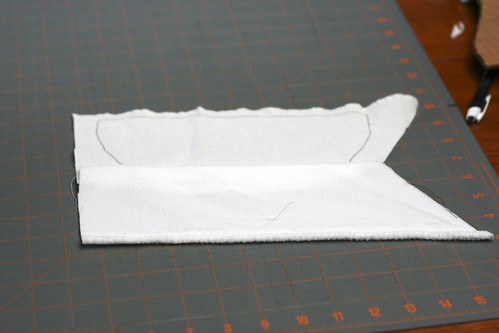  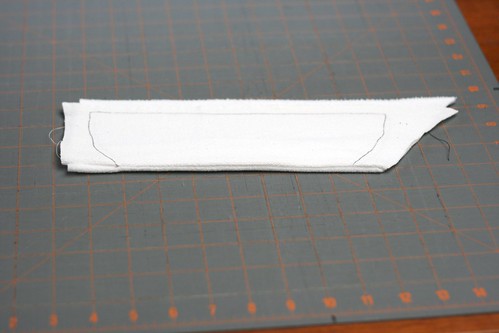 |
| Sew the right sides of your absorbent fabric and your microfleece together along the lines you traced onto the back of the absorbent layer. The right side of the absorbent layer is the side with the pattern traced on it. Trim the seams to one-quarter of an inch and fold the layers together so that the seam is hidden on the inside. |
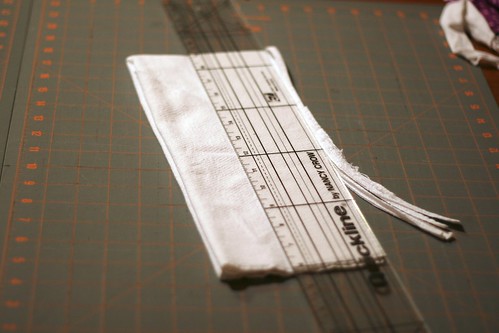 Use the rest of your flat fold, or whatever found material you would like for a pad and cut it to fit into your diaper. I like there to be at least an inch of leeway on the legs and back in order for the elastic to work. T-shirts can work really well for this insert as well. If you want a pocket diaper you will skip this step. Use the rest of your flat fold, or whatever found material you would like for a pad and cut it to fit into your diaper. I like there to be at least an inch of leeway on the legs and back in order for the elastic to work. T-shirts can work really well for this insert as well. If you want a pocket diaper you will skip this step. |
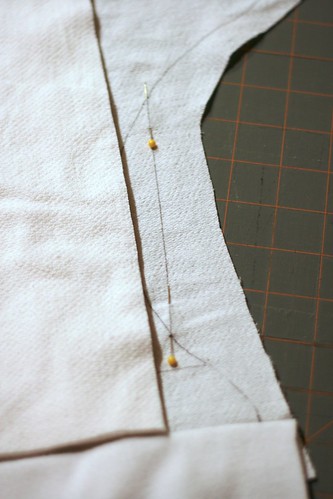 I carefully pin along the leg openings on both sides so that I can center the insert when I flip everything over. I carefully pin along the leg openings on both sides so that I can center the insert when I flip everything over. |
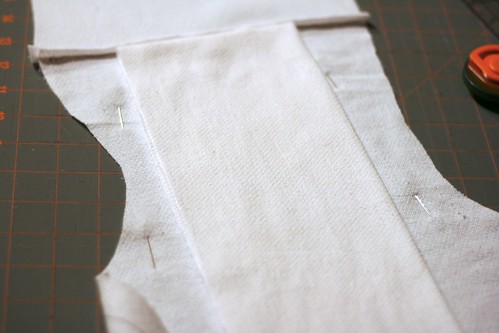 Center the insert along the back and pin it into place. Note: You are only sewing the insert to the absorbent material. You don't want your stitches poking through the microfiber and annoying your baby. Center the insert along the back and pin it into place. Note: You are only sewing the insert to the absorbent material. You don't want your stitches poking through the microfiber and annoying your baby. |
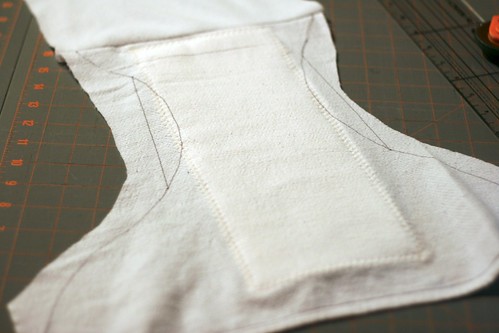 Sew it on with a zig-zag stitch that tries to catch the outside edge of the liner. This makes for a cleaner cut. I use my widest zig-zag, but set a pretty long stitch length. When you are done with this, fold the microfleece back down, so that the liner is hidden between the two layers. Sew it on with a zig-zag stitch that tries to catch the outside edge of the liner. This makes for a cleaner cut. I use my widest zig-zag, but set a pretty long stitch length. When you are done with this, fold the microfleece back down, so that the liner is hidden between the two layers. |
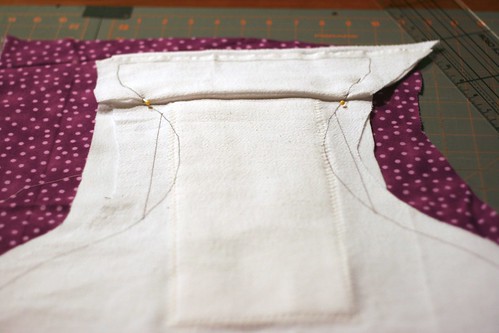 Line up your two pieces onto your flannel or PUL. You will want the microfleece to be next to the right side of your flannel or PUL if there is a right side.Whichever way your pocket looks like to you will be the opposite of the way it actually is when you turn it inside out. In the picture, I was playing with having my pocket open the opposite way of what you normally find. You will probably want the larger layer on top. You can also baste these two pieces together before attaching them to the outer if you find that simpler. Pin the pieces in place and sew around the entire diaper. Remember, you don't have to leave an opening to turn it inside out. The pocket takes care of that for you. Line up your two pieces onto your flannel or PUL. You will want the microfleece to be next to the right side of your flannel or PUL if there is a right side.Whichever way your pocket looks like to you will be the opposite of the way it actually is when you turn it inside out. In the picture, I was playing with having my pocket open the opposite way of what you normally find. You will probably want the larger layer on top. You can also baste these two pieces together before attaching them to the outer if you find that simpler. Pin the pieces in place and sew around the entire diaper. Remember, you don't have to leave an opening to turn it inside out. The pocket takes care of that for you. |
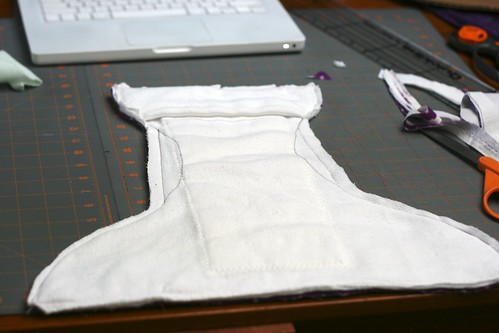 Trim everything around the edges. I usually leave about half an inch in the place I will have elastic and trim it down to a quarter of an inch elsewhere. I usually leave about two inches on either side of the back free of elastic and then put elastic in the entire straight portion of the leg openings. I sew the elastic at full stretch right onto the left over seam allowances. Trim everything around the edges. I usually leave about half an inch in the place I will have elastic and trim it down to a quarter of an inch elsewhere. I usually leave about two inches on either side of the back free of elastic and then put elastic in the entire straight portion of the leg openings. I sew the elastic at full stretch right onto the left over seam allowances. |
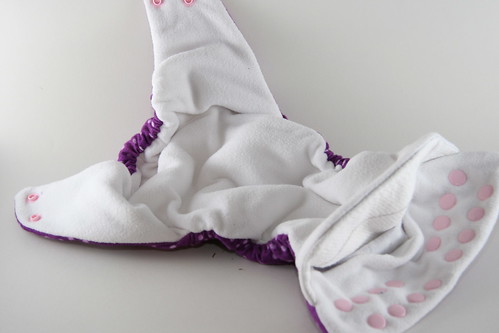 |
Add snaps or velcro and you have a finished diaper. Look at that pocket! |
| A couple of notes about AIOs: For a fitted, I normally stick to a five or six inch wide strip through the legs. This allows the diaper cover room to fit over the diaper. However for an AIO I like to bump i=this up to about seven. I also increase the amount of elastic I put in for the leg openings to make them more leak resistant. If you use microfleece on the inside, then you don't need to worry about it turning out a little when it is on the baby. Since it doesn't hold moisture, it won't leak. However if you use microfiber or flannel, you will need to be more careful and try to make the inside layer smaller than the outside, so that it will turn into the baby and not wick moisture outwards. I really recommend microfleece anyway, since it does a better job of keeping the baby's bum dry. |
Wednesday, July 29, 2009
Loaves of Fishes

Last summer my mother-in-law found the square cake pan she had been searching for at a garage sale. Unfortunately, it came with about 20 other tins, so when we were visiting she told us to pick out some we liked. My husband, of course, chose the fish shaped Jell-o mold and then made me bake his birthday cake in it. It was the worst baking experience of my life! It is completely impossible to pull the cake out in one piece. However, it was also wonderfully fun to decorate.
Thus, when my husband suggested we make some fish shaped cakes for Maddy's baptism I immediately told him he was crazy and then five minutes later agreed. One of the fish is chocolate cake with chocolate frosting and peanut butter M&Ms. The other is lemon cake with strawberry frosting. That one is topped with pull and peel twizzlers and gummy bears. The first time, I used jelly beans instead of gummy bears. It looked better, but was *way* too sweet.
Sunday, July 12, 2009
It's raining diaper wipes!
 Finally got around to posting pictures of a baby shower gift I put together a month or so ago. Some friends of mine are expecting a little girl at the end of the month and are planning to use cloth diapers. I am a big fan of the cloth diapers and when I was researching them for my daughter, I came across the concept of flannel diaper wipes. I think they are brilliant! I've never been a big fan of the disposable wipes that are slippery and kind of icky (though I do consent to using them for the diaper bag).
These flannel wipes feel nicer and do a better job of cleaning up a dirty diaper. They are also great for giving morning and evening sponge baths. They are simple to make and are a great use for scrap flannel. It is better if your flannel is pre-shrunk, but if you don't care about having your wipes end up different sizes then it doesn't really matter.
Cut all of your scraps into 4" x 7" pieces. You'll want two pieces for every diaper wipe. Pair up all of your pieces and do a tight zig-zag stitch around the outside, staying close to the edge. I usually set my stitch length to 1 and my width to 5. The shorter your stitch length, the less the edges will unravel in the wash, but it doesn't really matter, as all the loose ends will come out within about five washes anyway.
To make the wipe solution, you just need a 1:2 ratio of water to witch hazel. This means that you split one bottle of witch hazel up into three bottles and top them all off with water. Maddy likes the wipe warmer, too, though it isn't necessary. If you want one, I recommend the Prince Lionheart Warmer without the antibacterial insert.The wipes fit well within it and if you make them twice as wide you can even fold the wipes together and pull them through the top. You will want to make sure you always have plenty of solution though, as the bottom wipes will burn if they get dry.
Not enough time to build it yourself? Buy it from my store!
Thursday, June 25, 2009
A Gym for Maddy
 I dislike flashing, singing toys with a passion. It's not that I mind the noise. When Maddy is old enough, I'll happily provide her with some pots and the wooden spoons to bang on them. I just don't like it when the noise keeps going after the child is done with the toy. Or even worse, the toy yells after the child like a salesman trying to regain someone's attention. Thus, my dilemma when I headed out to the store to buy Maddy a gym to hang toys from. Any gym that looked any good contained flashing lights and sounds. Sure, I could take the batteries out, but why would I pay extra for something I actively dislike. So I decided to save money build my own gym. And like any good crafter I went to the internet for inspiration.
This is the only thing I could find: How to make a baby gym. I wanted something a little fancier, but that was inspiration enough. I went to the store and bought the following (everything is for 1/2" PVC):
 1 cross connector
8 forty-five degree connectors
4 ninety degree connectors
2 eight foot pipes
I cut the pipe into the following pieces:
8 one-inch pieces
4 eighteen-inch pieces
2 twenty-five and three-eighths inch pieces
 I used the one inch pieces to connect my connectors to each other. Each ninety degree connector got paired with a forty-five degree connector. The four remaining forty-five degree connectors were attached to the cross connector.
 And then I assembled the gym into a pyramid shape. This ended up being a bit smaller than I wanted, but I haven't settled on a final size yet, so I'll write more when the project is complete.
 The best part was making the cloth to cover the PVC. I raided my ribbon stash to create loops every two inches or so. I also found all sorts of nice fabrics and buttons to sew into the bottom of the legs so that Maddy has lots of different textures and shapes to keep herself entertained.
I still need to cover the bottom and create a fantastic playmat for it to sit on, but as you can see from the picture up top, the new gym is a hit with the kiddo.
Monday, June 15, 2009
Cables, Grandmothers and a Lesson in Communication
 Last fall, I successfully completed my first knitting project with cables. Not one to follow patterns, I created this cute red hat in the round by making it up as I went along. That's what made what happened later so much fun!
My husband and I went to Amsterdam to celebrate the new year later that winter. Not wanting to be completely ignorant American tourists, we prepared for the trip by listening to some dutch language CDs and borrowing a dictionary from the library. For the most part, they were completely unnecessary, as almost everything is written in Dutch and English.
 Then came the train ride home from our visit to Den Hague and the cute little grandmother sitting across from us. Shortly into our ride she accosted me and started asking me about my hat. In Dutch. She thought it was the cutest thing and wanted to make one for her granddaughter. From there followed the most amusing (and complex) discussion of knitting I have ever had. She poked at it, I held up fingers and tried to remember my dutch numbers. She asked questions and I pointed some more. Luckily, my dictionary contained the translation for 'knit.' Finally, I succeeded in writing out directions involving knitting, opposite knitting (alas, the dictionary could not hope to contain purl), and braiding (I didn't want to rely on cable translating correctly). So hopefully, there is some Dutch girl somewhere wearing my hat.
Wednesday, June 10, 2009
Birds on a Wire
Maddy's room needed some fun curtains to go with the new paint job. I prefer to let a lot of light in the house, even when there is a need for privacy. Thus, I'm really fond of top-down bottom-up curtains. They are even easy to make, once you understand the concepts. I didn't manage to take pictures of the process on the these curtains, but when I finally get around to making the curtains for our bedroom, I'll be sure to write up some detailed instructions.
I picked out a fabulous shade of bright yellow and set my husband to work on the design. He decided that birds on a wire would be the best and we both wanted the curtains to look a bit different from each other. Once he had the template created and drawn onto the curtains, I got out my embroidery hoop and went to work. I think the final project looks rather stellar.
I picked out a fabulous shade of bright yellow and set my husband to work on the design. He decided that birds on a wire would be the best and we both wanted the curtains to look a bit different from each other. Once he had the template created and drawn onto the curtains, I got out my embroidery hoop and went to work. I think the final project looks rather stellar.
Saturday, May 30, 2009
Maddy's Room
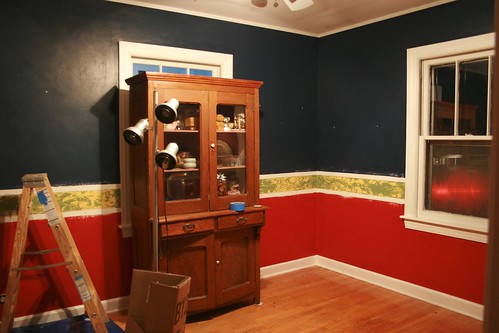 The house we live in does not have a formal dining room. This means that generations of previous owners have tried to turn various rooms into a dining room. At some point an owner thought it would be a good idea to paint the guest bedroom in dark colors complete with a chair rail and texturing. This picture shows how it looked after we'd removed the chair rail and sanded the texture. With our baby girl due in April, we decided it was time for a change.
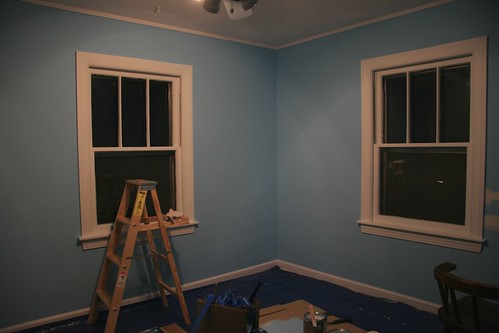 After I stopped teaching at the end of the semester to go on maternity leave, my mother came out to help paint the nursery a more suitable color. My husband and I weren't about to let the fact that we were having a girl keep us from painting the room a nice sky blue.
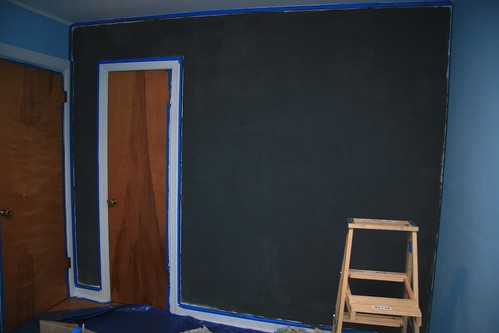 We painted one of the walls with magnetic receptive primer. This way when the kiddo gets a bit bigger we have a whole wall on which to hang art work and homemade magnets. Sadly, it isn't super strong so we can't have the world's best marble track. After the primer, this wall got was painted tree green (like in the accents below.) Magnetic primer is really dark, so the blue would have been a different shade on that wall.
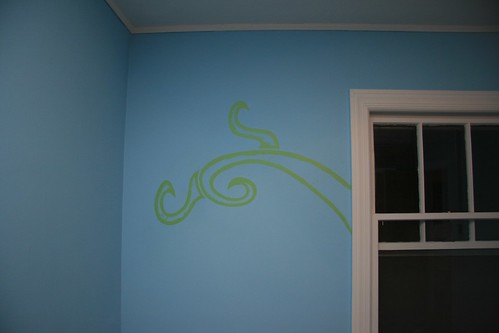 I wanted a little decoration for the walls, so I designed a giant tree with curly branches. However, it didn't end up fitting well anywhere in the room. So instead we will have several smaller branches coming out of windows and door frames. This is the start of the first one. Mafe Maria's page on creating a mural was really helpful in breaking down the process. I really wanted to have the walls be the same terrific shade of yellow, but alas, we already had a shade of yellow in the hallway and it just didn't work.
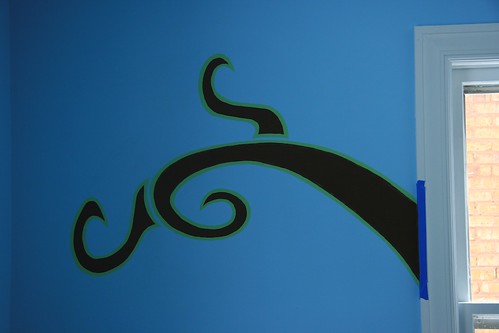 Here is the tree branch with the brown filled in. In another project I am going to cut leaves out of mat board to paint. We will then stick them to the wall with sticky tack. This way the leaves can move around and we can even have them change colors and fall off in the fall. More on that later, along with the updated branches.
Subscribe to:
Posts (Atom)
