
I've been playing with a bit of patternmaking lately.
A few Christmases ago I received Patternmaking for Fashion Design, but didn't have a lot of time to play with it. The basic blocks take a bit of calculation. Nothing major, but I'd been biking a bit and losing baby-weight and didn't want to put a lot of time into making my own blocks, just to have them change before I got to sew up some clothes.
Recently, however, I came across an article talking about some new open source pattern-making software. I played with Valentina a bit, but I was really drawn towards the Tau Meta Tau Project. Susan, from TMTP is currently working on Valentina as well, so I expect the whole thing will be quite awesome in a year or two.
I'm not patient, though, and don't mind a bit of hacking, so I've been making TMTP do what I want it to and have had quite a bit of fun with it. All I've done so far is make the basic bodice, skirt, and dress blocks, but in the process, I've done quite a bit of work to get things more streamlined for myself. Also, I had to find a new source for pattern blocks, because, having done all of this work, I wanted to be able to share! So I did some research and came across a wonderful, copyright expired book by Esther Pivnick, that had been scanned by The Perfect Nose.
Anyways, the basic idea is, once you've got the extensions saved, you open Inkscape, load and extension, enter your measurements, and you have a block custom fit to your body. If you don't want to bother with your measurements, it can also load up standard sizes, but then it isn't quite so perfect.
If you want to play with it yourself, click on the "Open Source Patternmaking" link at the top of the page, or go here.
Showing posts with label sewing. Show all posts
Showing posts with label sewing. Show all posts
Sunday, February 2, 2014
Friday, March 25, 2011
A Dress for Maddy


 |
| Don't you just love the linebacker pose? |
The pattern is almost done and I have a great pair of reversible pants waiting to be matched with a new tunic. When I get them done, I'll list them in the shop and let you know!
Thursday, August 6, 2009
Dressed to a T(-shirt)

I love dressing Maddy in long dresses. They are so cute and a lot of fun to make. They'll be a bit easier when she starts walking and they don't bunch up all the time, but I still think they're pretty cute right now anyway. So with all of the t-shirt dresses popping up (Happy Together and luvinthemommyhood), I decided it was time for me to make my own. It's really simple. Only the sides are sewn together, everything else is left raw and the straps are tied at the top. I am pretty fond of the cute little denim birdie though.

Maddy's not so sure about this green stuff she's standing in. It's a bit poky.

Now she's ready to face the world!
Thursday, July 30, 2009
Loading up on Diapers
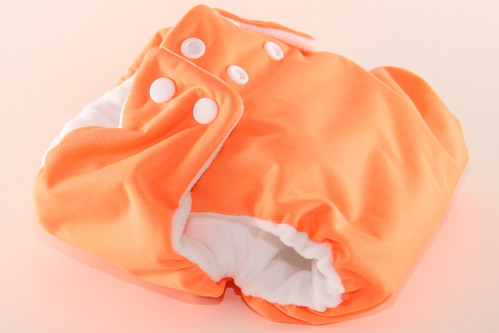 For the past few months I have been diapering Maddy with flats folded with the origami fold and a diaper cover, but I am getting tired of folding them every day. I have been selling contour diapers for awhile and had planned to make a bunch for myself, but I broke down and bought a snap press for my birthday and set about finding the perfect way to make fitteds and AIOs. I don't like having my seams show, so I set about hiding them by adding the fancy feature of a pocket and I don't like having to try to line up fabrics that are shift by nature, so I decided to solve that by trimming everything after the fact. Below is what I have discovered.
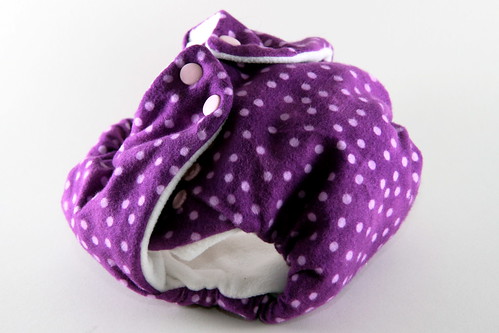
Don't forget, if you don't have the time or inclination to make them yourself you can by them at http://www.lazydayartifacts.com/
Materials:
These pictures are for a diaper I was selling, so they use new fabrics, but when I am making diapers for my own baby, usually I forage all but the PUL from the thrift store. For high quality diaper fabrics, I highly recommend Kids in the Garden. They sell single cuts of PUL for diapers and most of their fabric is available by the inch.
* 20" x 15" piece of microfleece or any other soft lining fabric. I like microfleece because it keeps the moisture away from the baby's bum.
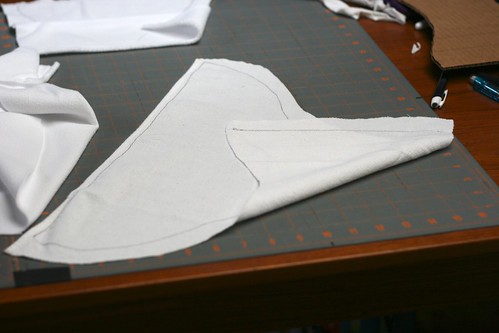
* One flat fold diaper or other absorbent fabric. You'll want something that keeps it's shape, as this is what you'll draw your pattern onto.
* 20" x 20" piece of flannel or PUL depending on whether you are making a fitted or AIO
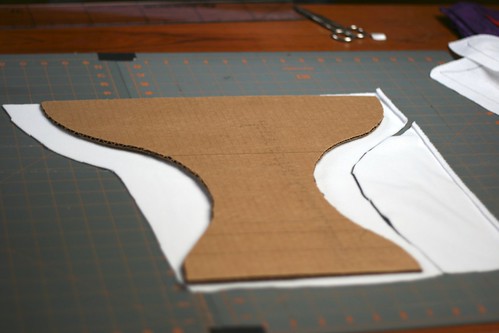
* Some cardboard from a shipping or cereal box for tracing your pattern.
* Scissors, thread, etc.
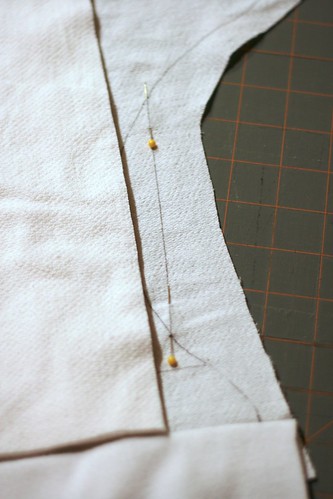
First, you need a pattern. Fern and Faerie 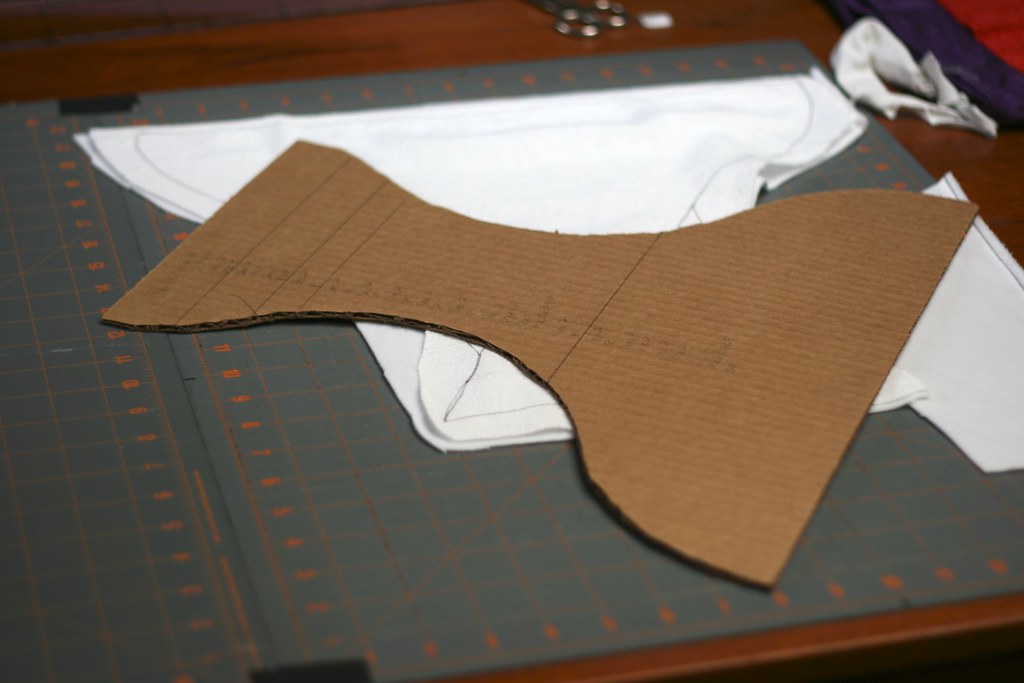 provides a nice pattern to start. The cardboard cutout I have is for contour diapers. I find that when you add the elastic for fitteds, you want some more room through the legs, otherwise the elastic can't handle the lining. So, I lose the hourglass shape through the legs and replace it with a straight line. provides a nice pattern to start. The cardboard cutout I have is for contour diapers. I find that when you add the elastic for fitteds, you want some more room through the legs, otherwise the elastic can't handle the lining. So, I lose the hourglass shape through the legs and replace it with a straight line. |
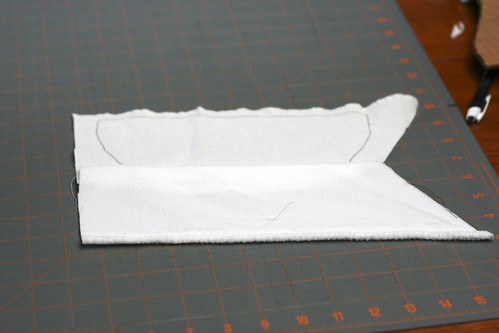
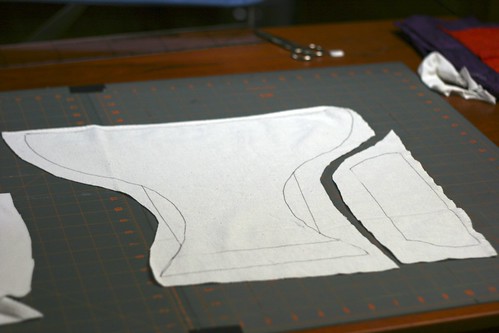 Make two lines at the top of your pattern. One should be about an inch and a half down and the other about two and a half inches. This will be where your stuffing pocket goes. Trace this pattern onto your absorbent layer, stopping at the top line you drew. Then trace the top portion (between the top and the second line). This bit should fit between the leg opening and the side of your material as you can see to the right. Cut these out roughly, making sure to leave a minimum half-inch seam allowance. Make two lines at the top of your pattern. One should be about an inch and a half down and the other about two and a half inches. This will be where your stuffing pocket goes. Trace this pattern onto your absorbent layer, stopping at the top line you drew. Then trace the top portion (between the top and the second line). This bit should fit between the leg opening and the side of your material as you can see to the right. Cut these out roughly, making sure to leave a minimum half-inch seam allowance. |
 For both pieces, you will want to trace the pocket opening onto the back of the material. This will provide your guide when you attach the absorbent material and the liner. For both pieces, you will want to trace the pocket opening onto the back of the material. This will provide your guide when you attach the absorbent material and the liner. |
 Roughly cut out your microfleece the same way you cut your absorbent layer. Cut the flannel or PUL to the size of the whole diaper. Don't worry about precision, as long as you leave enough room. It is much easier and neater to do all of the trimming after everything is sewn together. Roughly cut out your microfleece the same way you cut your absorbent layer. Cut the flannel or PUL to the size of the whole diaper. Don't worry about precision, as long as you leave enough room. It is much easier and neater to do all of the trimming after everything is sewn together. |
   |
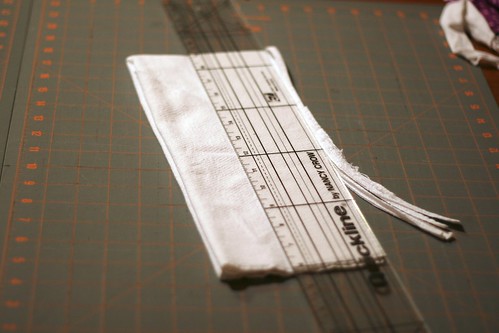
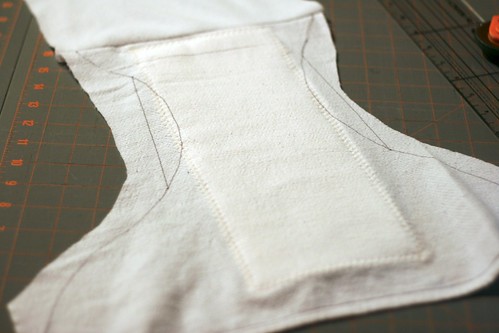
| Sew the right sides of your absorbent fabric and your microfleece together along the lines you traced onto the back of the absorbent layer. The right side of the absorbent layer is the side with the pattern traced on it. Trim the seams to one-quarter of an inch and fold the layers together so that the seam is hidden on the inside. |
 Use the rest of your flat fold, or whatever found material you would like for a pad and cut it to fit into your diaper. I like there to be at least an inch of leeway on the legs and back in order for the elastic to work. T-shirts can work really well for this insert as well. If you want a pocket diaper you will skip this step. Use the rest of your flat fold, or whatever found material you would like for a pad and cut it to fit into your diaper. I like there to be at least an inch of leeway on the legs and back in order for the elastic to work. T-shirts can work really well for this insert as well. If you want a pocket diaper you will skip this step. |
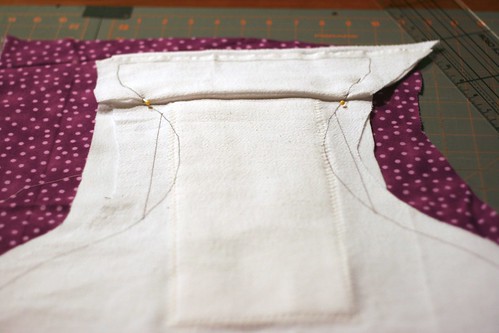
 I carefully pin along the leg openings on both sides so that I can center the insert when I flip everything over. I carefully pin along the leg openings on both sides so that I can center the insert when I flip everything over. |
 Center the insert along the back and pin it into place. Note: You are only sewing the insert to the absorbent material. You don't want your stitches poking through the microfiber and annoying your baby. Center the insert along the back and pin it into place. Note: You are only sewing the insert to the absorbent material. You don't want your stitches poking through the microfiber and annoying your baby. |
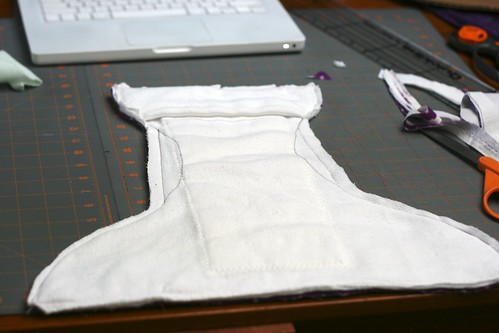
 Sew it on with a zig-zag stitch that tries to catch the outside edge of the liner. This makes for a cleaner cut. I use my widest zig-zag, but set a pretty long stitch length. When you are done with this, fold the microfleece back down, so that the liner is hidden between the two layers. Sew it on with a zig-zag stitch that tries to catch the outside edge of the liner. This makes for a cleaner cut. I use my widest zig-zag, but set a pretty long stitch length. When you are done with this, fold the microfleece back down, so that the liner is hidden between the two layers. |
 Line up your two pieces onto your flannel or PUL. You will want the microfleece to be next to the right side of your flannel or PUL if there is a right side.Whichever way your pocket looks like to you will be the opposite of the way it actually is when you turn it inside out. In the picture, I was playing with having my pocket open the opposite way of what you normally find. You will probably want the larger layer on top. You can also baste these two pieces together before attaching them to the outer if you find that simpler. Pin the pieces in place and sew around the entire diaper. Remember, you don't have to leave an opening to turn it inside out. The pocket takes care of that for you. Line up your two pieces onto your flannel or PUL. You will want the microfleece to be next to the right side of your flannel or PUL if there is a right side.Whichever way your pocket looks like to you will be the opposite of the way it actually is when you turn it inside out. In the picture, I was playing with having my pocket open the opposite way of what you normally find. You will probably want the larger layer on top. You can also baste these two pieces together before attaching them to the outer if you find that simpler. Pin the pieces in place and sew around the entire diaper. Remember, you don't have to leave an opening to turn it inside out. The pocket takes care of that for you. |
 Trim everything around the edges. I usually leave about half an inch in the place I will have elastic and trim it down to a quarter of an inch elsewhere. I usually leave about two inches on either side of the back free of elastic and then put elastic in the entire straight portion of the leg openings. I sew the elastic at full stretch right onto the left over seam allowances. Trim everything around the edges. I usually leave about half an inch in the place I will have elastic and trim it down to a quarter of an inch elsewhere. I usually leave about two inches on either side of the back free of elastic and then put elastic in the entire straight portion of the leg openings. I sew the elastic at full stretch right onto the left over seam allowances. |
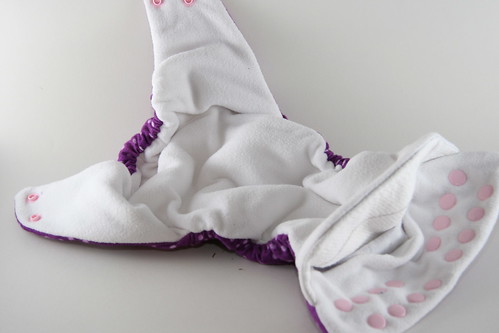 |
Add snaps or velcro and you have a finished diaper. Look at that pocket! |
| A couple of notes about AIOs: For a fitted, I normally stick to a five or six inch wide strip through the legs. This allows the diaper cover room to fit over the diaper. However for an AIO I like to bump i=this up to about seven. I also increase the amount of elastic I put in for the leg openings to make them more leak resistant. If you use microfleece on the inside, then you don't need to worry about it turning out a little when it is on the baby. Since it doesn't hold moisture, it won't leak. However if you use microfiber or flannel, you will need to be more careful and try to make the inside layer smaller than the outside, so that it will turn into the baby and not wick moisture outwards. I really recommend microfleece anyway, since it does a better job of keeping the baby's bum dry. |
Sunday, July 12, 2009
It's raining diaper wipes!
 Finally got around to posting pictures of a baby shower gift I put together a month or so ago. Some friends of mine are expecting a little girl at the end of the month and are planning to use cloth diapers. I am a big fan of the cloth diapers and when I was researching them for my daughter, I came across the concept of flannel diaper wipes. I think they are brilliant! I've never been a big fan of the disposable wipes that are slippery and kind of icky (though I do consent to using them for the diaper bag).
These flannel wipes feel nicer and do a better job of cleaning up a dirty diaper. They are also great for giving morning and evening sponge baths. They are simple to make and are a great use for scrap flannel. It is better if your flannel is pre-shrunk, but if you don't care about having your wipes end up different sizes then it doesn't really matter.
Cut all of your scraps into 4" x 7" pieces. You'll want two pieces for every diaper wipe. Pair up all of your pieces and do a tight zig-zag stitch around the outside, staying close to the edge. I usually set my stitch length to 1 and my width to 5. The shorter your stitch length, the less the edges will unravel in the wash, but it doesn't really matter, as all the loose ends will come out within about five washes anyway.
To make the wipe solution, you just need a 1:2 ratio of water to witch hazel. This means that you split one bottle of witch hazel up into three bottles and top them all off with water. Maddy likes the wipe warmer, too, though it isn't necessary. If you want one, I recommend the Prince Lionheart Warmer without the antibacterial insert.The wipes fit well within it and if you make them twice as wide you can even fold the wipes together and pull them through the top. You will want to make sure you always have plenty of solution though, as the bottom wipes will burn if they get dry.
Not enough time to build it yourself? Buy it from my store!
Thursday, June 25, 2009
A Gym for Maddy
 I dislike flashing, singing toys with a passion. It's not that I mind the noise. When Maddy is old enough, I'll happily provide her with some pots and the wooden spoons to bang on them. I just don't like it when the noise keeps going after the child is done with the toy. Or even worse, the toy yells after the child like a salesman trying to regain someone's attention. Thus, my dilemma when I headed out to the store to buy Maddy a gym to hang toys from. Any gym that looked any good contained flashing lights and sounds. Sure, I could take the batteries out, but why would I pay extra for something I actively dislike. So I decided to save money build my own gym. And like any good crafter I went to the internet for inspiration.
This is the only thing I could find: How to make a baby gym. I wanted something a little fancier, but that was inspiration enough. I went to the store and bought the following (everything is for 1/2" PVC):
 1 cross connector
8 forty-five degree connectors
4 ninety degree connectors
2 eight foot pipes
I cut the pipe into the following pieces:
8 one-inch pieces
4 eighteen-inch pieces
2 twenty-five and three-eighths inch pieces
 I used the one inch pieces to connect my connectors to each other. Each ninety degree connector got paired with a forty-five degree connector. The four remaining forty-five degree connectors were attached to the cross connector.
 And then I assembled the gym into a pyramid shape. This ended up being a bit smaller than I wanted, but I haven't settled on a final size yet, so I'll write more when the project is complete.
 The best part was making the cloth to cover the PVC. I raided my ribbon stash to create loops every two inches or so. I also found all sorts of nice fabrics and buttons to sew into the bottom of the legs so that Maddy has lots of different textures and shapes to keep herself entertained.
I still need to cover the bottom and create a fantastic playmat for it to sit on, but as you can see from the picture up top, the new gym is a hit with the kiddo.
Subscribe to:
Posts (Atom)
